> ## Documentation Index
> Fetch the complete documentation index at: https://docs.a2v2.ai/llms.txt
> Use this file to discover all available pages before exploring further.
# API Keys & Permissions
> Create scoped API keys so external apps can securely read and write your CRM contacts and extract documents.
You want your own app, a workflow tool, or a backend service to pull contacts out of
A2V2.ai or push data in — without handing over your login. **API Permissions** lets you
create API keys, each scoped to exactly what that integration needs and nothing more.
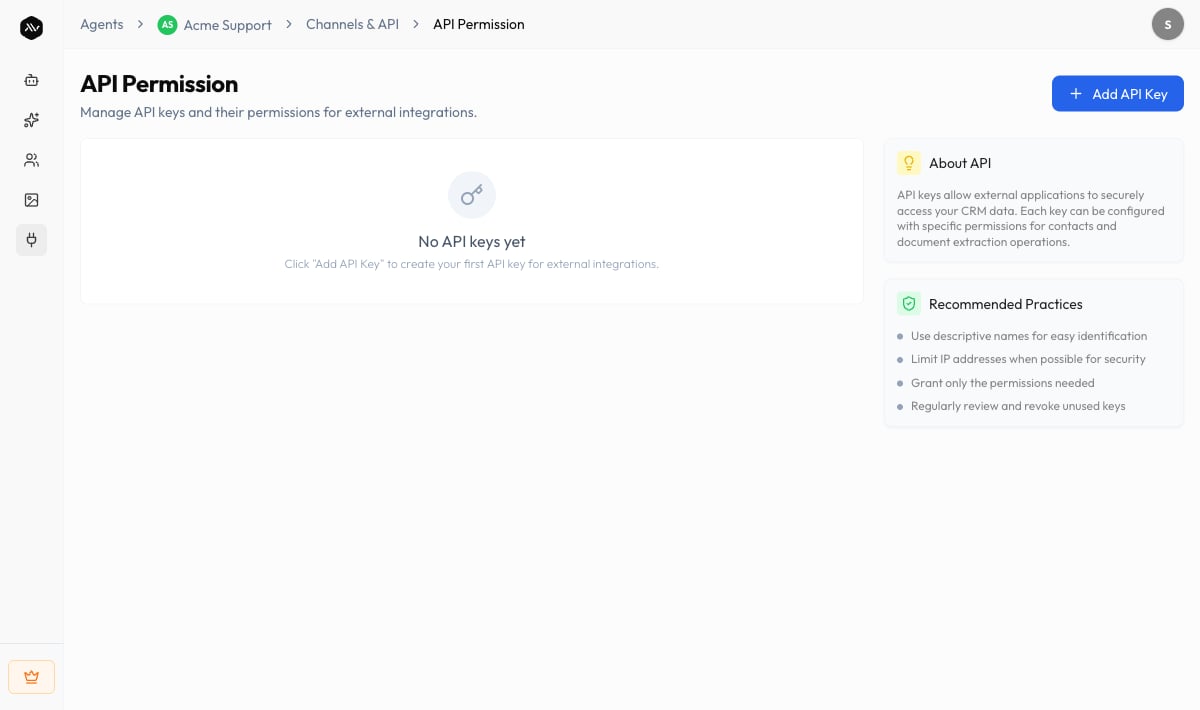
Open an agent and choose **Channels & API → API Permissions** in the sidebar. The page
is titled **API Permission**, with the subtitle "Manage API keys and their permissions
for external integrations."
**API Permissions is desktop-only.** Open it on a larger screen — on mobile A2V2.ai
shows a "Desktop Only" notice for this feature.
## Prerequisites
* An agent (see [Create an agent](/building/create-agent)).
* A place to store the key securely (a secrets manager or your app's environment), since
a key grants programmatic access to your data.
## How keys and permissions work
Each API key carries its own set of permissions across two areas — **Contact Access**
and **Document Extraction Access** — and you choose which actions it can perform.
A2V2.ai recommends granting only the permissions an integration actually needs and
revoking keys you no longer use.
| Access area | What it covers |
| ------------------------------ | ------------------------------------------------------------------- |
| **Contact Access** | Reading and writing your CRM [contacts](/crm/contacts) over the API |
| **Document Extraction Access** | Programmatic document extraction operations |
For each area you grant any combination of these actions:
| Permission | What it allows |
| ---------- | ------------------------- |
| **Create** | Add new records |
| **Read** | Retrieve existing records |
| **Update** | Change existing records |
| **Delete** | Remove records |
## Create an API key
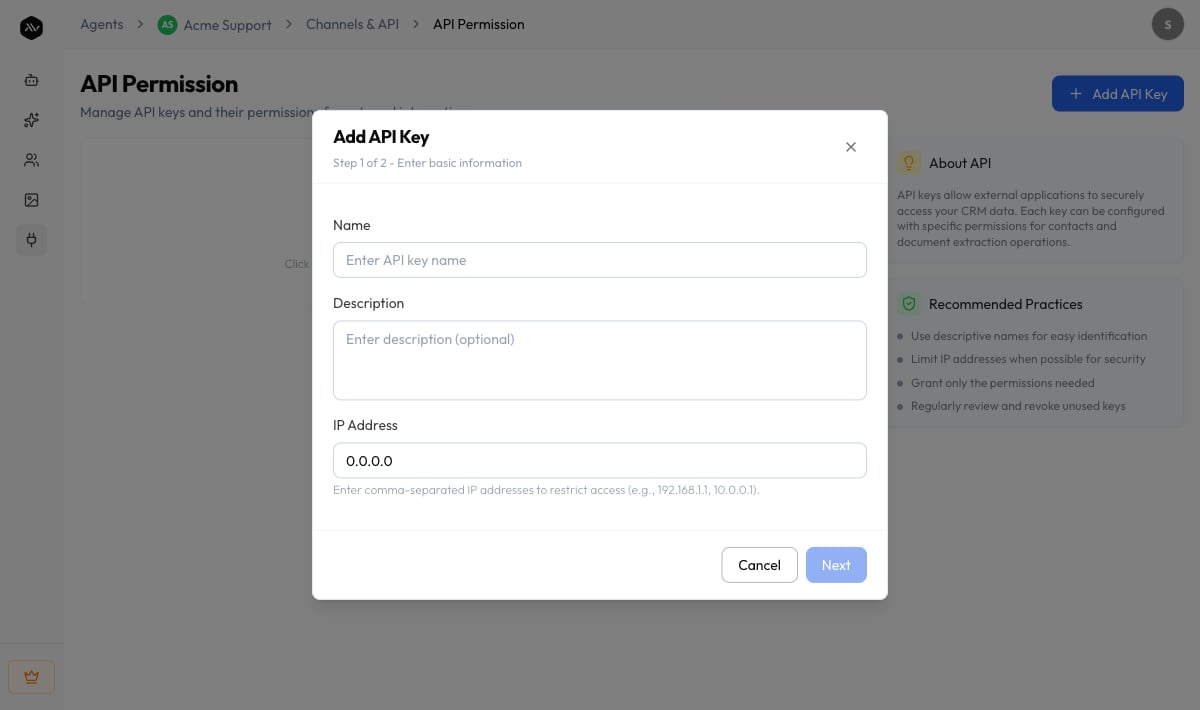
On your agent, go to **Channels & API → API Permissions** and select **Add API Key**.
 This is **Step 1 of 2 — Enter basic information**. Give the key a **Name** (up to 100
characters) and an optional **Description** (up to 500 characters). You can also enter
one or more comma-separated **IP Address** values to restrict which addresses may use
the key (for example `192.168.1.1, 10.0.0.1`). Select **Next**.
This is **Step 1 of 2 — Enter basic information**. Give the key a **Name** (up to 100
characters) and an optional **Description** (up to 500 characters). You can also enter
one or more comma-separated **IP Address** values to restrict which addresses may use
the key (for example `192.168.1.1, 10.0.0.1`). Select **Next**.
 On **Step 2 of 2 — Configure permissions**, choose the **Create / Read / Update /
Delete** actions you want under **Contact Access** and **Document Extraction Access**.
Then select **Give Access**. You'll see "API key created successfully."
Use **Copy API Key** to copy it to your clipboard ("API key copied to clipboard"),
then store it somewhere secure in your integration.
## The keys list
Each key appears as a row with these columns:
| Column | What it shows |
| ----------- | ---------------------------------------------------------------------------------------- |
| **Name** | The name you gave the key |
| **Access** | Badges for what the key can reach — **Contacts** and/or **Documents** (or **No access**) |
| **Created** | When the key was created |
From a row you can **Copy API Key**, edit it, or delete it. Before you create any, the
page reads "No API keys yet."
## Edit or delete a key
* **Edit** a key to rename it, change its description or IP restrictions, or adjust its
permissions. Saving shows "API key updated successfully."
* **Delete** a key to revoke it. The confirmation warns that the key is permanently
deleted and "Any applications using this key will lose access."
Deleting an API key is permanent and immediate — any app or service still using that key
stops working at once. Rotate integrations to a new key before deleting the old one.
Recommended practices, straight from the product: use descriptive names so keys are easy
to identify, limit IP addresses where you can, grant only the permissions each
integration needs, and regularly review and revoke unused keys.
## Troubleshooting
API Permissions is available on desktop only. Open A2V2.ai on a larger screen to
create or manage keys.
Check two things: the key must include the **permission** for the action you're
making (Create / Read / Update / Delete in the right access area), and if you set **IP
Address** restrictions, the request must come from a listed address.
Copy it again from the key's row with **Copy API Key**. If you can't use it, delete
the key and create a new one, then update your integration.
## Related
The CRM data your Contact Access keys read and write.
Add the agent to your site with the chat bubble or iframe.
Control who on your team can manage the workspace.
Track activity across your organization.
On **Step 2 of 2 — Configure permissions**, choose the **Create / Read / Update /
Delete** actions you want under **Contact Access** and **Document Extraction Access**.
Then select **Give Access**. You'll see "API key created successfully."
Use **Copy API Key** to copy it to your clipboard ("API key copied to clipboard"),
then store it somewhere secure in your integration.
## The keys list
Each key appears as a row with these columns:
| Column | What it shows |
| ----------- | ---------------------------------------------------------------------------------------- |
| **Name** | The name you gave the key |
| **Access** | Badges for what the key can reach — **Contacts** and/or **Documents** (or **No access**) |
| **Created** | When the key was created |
From a row you can **Copy API Key**, edit it, or delete it. Before you create any, the
page reads "No API keys yet."
## Edit or delete a key
* **Edit** a key to rename it, change its description or IP restrictions, or adjust its
permissions. Saving shows "API key updated successfully."
* **Delete** a key to revoke it. The confirmation warns that the key is permanently
deleted and "Any applications using this key will lose access."
Deleting an API key is permanent and immediate — any app or service still using that key
stops working at once. Rotate integrations to a new key before deleting the old one.
Recommended practices, straight from the product: use descriptive names so keys are easy
to identify, limit IP addresses where you can, grant only the permissions each
integration needs, and regularly review and revoke unused keys.
## Troubleshooting
API Permissions is available on desktop only. Open A2V2.ai on a larger screen to
create or manage keys.
Check two things: the key must include the **permission** for the action you're
making (Create / Read / Update / Delete in the right access area), and if you set **IP
Address** restrictions, the request must come from a listed address.
Copy it again from the key's row with **Copy API Key**. If you can't use it, delete
the key and create a new one, then update your integration.
## Related
The CRM data your Contact Access keys read and write.
Add the agent to your site with the chat bubble or iframe.
Control who on your team can manage the workspace.
Track activity across your organization.