> ## Documentation Index
> Fetch the complete documentation index at: https://docs.a2v2.ai/llms.txt
> Use this file to discover all available pages before exploring further.
# What Your Visitors Experience
> A tour of the chat from the visitor's side: streaming answers, suggested questions, feedback, file uploads, voice input, saved history, and the A2V2.ai branding.
When someone opens your agent — as a chat bubble, an inline iframe, or the hosted
share link — they get the same polished chat experience. Knowing exactly what a
visitor sees helps you set up the right welcome message, suggested questions, and
appearance. This page walks through the chat from their side.
Everything here is visitor-facing. You configure most of it from the agent's
**Agent UI** screens — see [Appearance](/customize/appearance) and
[Message customization](/customize/messages).
 ## Opening the chat
How visitors enter depends on how you embedded the agent:
| Entry point | What the visitor does |
| ----------------- | -------------------------------------------------------------------------------------------------- |
| **Chat bubble** | Clicks the floating button (labeled **Open chat**) to expand the window; clicks again to minimize. |
| **Inline iframe** | The chat is already visible, embedded in your page. |
| **Share link** | Opens the agent on its own full-page hosted screen at `chat.a2v2.ai`. |
If you've turned on the auto-show welcome message, the bubble can open with your
greeting after a short delay.
## The first thing they see
A new visitor lands on a welcoming starting view, which can include:
* **A welcome message** — the greeting you set in
[Message customization](/customize/messages).
* **Suggested questions** — tappable chips of starter questions. A visitor can click
one instead of typing, which is often how a conversation begins. You define these as
the agent's suggested messages.
## Asking a question and getting an answer
The visitor types in the **Ask a Question** box and sends with the **Send** button (or
Enter). As the agent works, they see live status indicators rather than a frozen
spinner:
| Indicator | What it means |
| ---------------------- | --------------------------------------------- |
| **Thinking…** | The agent is reasoning about the question. |
| **Processing…** | The agent is working through the request. |
| **Refining response…** | The agent is improving an in-progress answer. |
| ***N* tools used** | The agent ran tools or skills to answer. |
The answer then **streams in** word by word, so visitors start reading immediately
instead of waiting for the whole reply. Answers are formatted (headings, lists, links,
tables), and any links open in a new tab.
Answers are drawn from the agent's [knowledge base](/knowledge-base/overview). The
agent only answers from what you've given it, which is what keeps responses grounded
and on-topic.
## Acting on an answer
Each answer carries a few lightweight controls so visitors can react without leaving
the conversation:
| Action | What it does |
| ---------------- | ------------------------------------------ |
| **Copy message** | Copies the answer text to the clipboard. |
| **Like** | A thumbs-up to mark the answer as helpful. |
| **Dislike** | A thumbs-down to mark it unhelpful. |
If you've enabled feedback collection on a dislike, the visitor is asked to say what
went wrong — *"Please tell us what went wrong with this response"* — in a short
**Feedback** box. That feedback flows back to you so you can spot weak answers and
improve the knowledge base.
## Sending more than text
Depending on what you've enabled for the agent, visitors can also:
Visitors use **Attach file** to add a document or image for the agent to consider
in the conversation. The file uploads (showing **Uploading…**) and then becomes
part of the question's context.
This is available only when you've turned on file uploads for the agent. The
setting notes the supported types and size limit (PDFs, documents, and images, up
to 5 MB per file) — see the **Sandbox** settings in
[Test your agent](/testing/sandbox).
With **Voice input**, visitors tap **Start recording**, speak their question, and
the widget transcribes it into the message box (showing **Transcribing…**). They
can **Stop recording** or **Cancel recording** at any time.
Voice input is on by default but can be turned off per agent. If the browser blocks
microphone access, the visitor sees a prompt to enable it in their browser
settings. See the **Sandbox** settings in [Test your agent](/testing/sandbox).
## Picking up where they left off
The chat keeps a visitor's conversation history in their browser, so returning
visitors don't start from scratch:
* **New Chat** starts a fresh conversation.
* A **History** list (with **Search chats…**) lets them reopen earlier conversations,
grouped as Today, Yesterday, Previous 7 Days, and so on.
* Conversations persist for that visitor on that browser, even across page reloads.
History is tied to the visitor's browser. Someone on a different device or browser
starts a new history — unless they sign in to a
[restricted or paid agent](/widget/restricted-and-paid-access), which ties the
conversation to their verified identity.
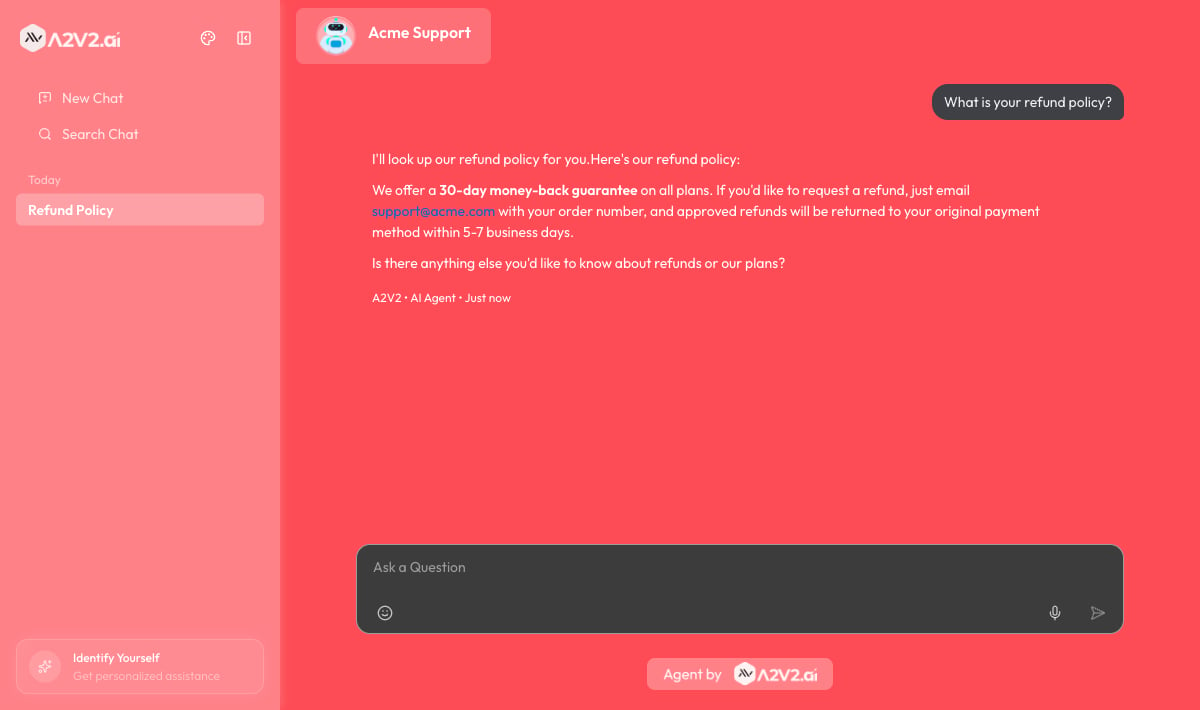
## The A2V2.ai branding
The chat shows a small **Agent by A2V2.ai** mark in the footer, and each answer is
tagged with an "AI Agent" label and timestamp. This tells visitors they're talking to
an AI assistant, which keeps the experience honest and sets the right expectations.
## Tips
* Write a warm, specific **welcome message** and 3–5 **suggested questions** — they're
the first thing visitors see and the easiest way to start a good conversation.
* Match the chat's **appearance** to your brand so the bubble feels native to your
site. See [Appearance](/customize/appearance).
* Use the **dislike feedback** visitors leave to find gaps in your knowledge base and
refine answers over time.
## Troubleshooting
Suggested questions only appear if you've added them. Set them in
[Message customization](/customize/messages).
Both are per-agent settings. Enable **Allow file uploads in chat** and **Allow
voice input in chat** in the agent's [Sandbox](/testing/sandbox) settings.
History is stored in the visitor's browser. Clearing site data, switching devices,
or using a private window starts a fresh history. For history that follows a person
across devices, use a [restricted or paid agent](/widget/restricted-and-paid-access)
so visitors sign in.
The agent only answers from its [knowledge base](/knowledge-base/overview). Add the
missing information as a source so future visitors get an answer.
## Related
Set the welcome message and suggested questions.
Style the chat to match your brand.
What sign-in and paywalls look like to visitors.
Add the chat to your website.
## Opening the chat
How visitors enter depends on how you embedded the agent:
| Entry point | What the visitor does |
| ----------------- | -------------------------------------------------------------------------------------------------- |
| **Chat bubble** | Clicks the floating button (labeled **Open chat**) to expand the window; clicks again to minimize. |
| **Inline iframe** | The chat is already visible, embedded in your page. |
| **Share link** | Opens the agent on its own full-page hosted screen at `chat.a2v2.ai`. |
If you've turned on the auto-show welcome message, the bubble can open with your
greeting after a short delay.
## The first thing they see
A new visitor lands on a welcoming starting view, which can include:
* **A welcome message** — the greeting you set in
[Message customization](/customize/messages).
* **Suggested questions** — tappable chips of starter questions. A visitor can click
one instead of typing, which is often how a conversation begins. You define these as
the agent's suggested messages.
## Asking a question and getting an answer
The visitor types in the **Ask a Question** box and sends with the **Send** button (or
Enter). As the agent works, they see live status indicators rather than a frozen
spinner:
| Indicator | What it means |
| ---------------------- | --------------------------------------------- |
| **Thinking…** | The agent is reasoning about the question. |
| **Processing…** | The agent is working through the request. |
| **Refining response…** | The agent is improving an in-progress answer. |
| ***N* tools used** | The agent ran tools or skills to answer. |
The answer then **streams in** word by word, so visitors start reading immediately
instead of waiting for the whole reply. Answers are formatted (headings, lists, links,
tables), and any links open in a new tab.
Answers are drawn from the agent's [knowledge base](/knowledge-base/overview). The
agent only answers from what you've given it, which is what keeps responses grounded
and on-topic.
## Acting on an answer
Each answer carries a few lightweight controls so visitors can react without leaving
the conversation:
| Action | What it does |
| ---------------- | ------------------------------------------ |
| **Copy message** | Copies the answer text to the clipboard. |
| **Like** | A thumbs-up to mark the answer as helpful. |
| **Dislike** | A thumbs-down to mark it unhelpful. |
If you've enabled feedback collection on a dislike, the visitor is asked to say what
went wrong — *"Please tell us what went wrong with this response"* — in a short
**Feedback** box. That feedback flows back to you so you can spot weak answers and
improve the knowledge base.
## Sending more than text
Depending on what you've enabled for the agent, visitors can also:
Visitors use **Attach file** to add a document or image for the agent to consider
in the conversation. The file uploads (showing **Uploading…**) and then becomes
part of the question's context.
This is available only when you've turned on file uploads for the agent. The
setting notes the supported types and size limit (PDFs, documents, and images, up
to 5 MB per file) — see the **Sandbox** settings in
[Test your agent](/testing/sandbox).
With **Voice input**, visitors tap **Start recording**, speak their question, and
the widget transcribes it into the message box (showing **Transcribing…**). They
can **Stop recording** or **Cancel recording** at any time.
Voice input is on by default but can be turned off per agent. If the browser blocks
microphone access, the visitor sees a prompt to enable it in their browser
settings. See the **Sandbox** settings in [Test your agent](/testing/sandbox).
## Picking up where they left off
The chat keeps a visitor's conversation history in their browser, so returning
visitors don't start from scratch:
* **New Chat** starts a fresh conversation.
* A **History** list (with **Search chats…**) lets them reopen earlier conversations,
grouped as Today, Yesterday, Previous 7 Days, and so on.
* Conversations persist for that visitor on that browser, even across page reloads.
History is tied to the visitor's browser. Someone on a different device or browser
starts a new history — unless they sign in to a
[restricted or paid agent](/widget/restricted-and-paid-access), which ties the
conversation to their verified identity.
## The A2V2.ai branding
The chat shows a small **Agent by A2V2.ai** mark in the footer, and each answer is
tagged with an "AI Agent" label and timestamp. This tells visitors they're talking to
an AI assistant, which keeps the experience honest and sets the right expectations.
## Tips
* Write a warm, specific **welcome message** and 3–5 **suggested questions** — they're
the first thing visitors see and the easiest way to start a good conversation.
* Match the chat's **appearance** to your brand so the bubble feels native to your
site. See [Appearance](/customize/appearance).
* Use the **dislike feedback** visitors leave to find gaps in your knowledge base and
refine answers over time.
## Troubleshooting
Suggested questions only appear if you've added them. Set them in
[Message customization](/customize/messages).
Both are per-agent settings. Enable **Allow file uploads in chat** and **Allow
voice input in chat** in the agent's [Sandbox](/testing/sandbox) settings.
History is stored in the visitor's browser. Clearing site data, switching devices,
or using a private window starts a fresh history. For history that follows a person
across devices, use a [restricted or paid agent](/widget/restricted-and-paid-access)
so visitors sign in.
The agent only answers from its [knowledge base](/knowledge-base/overview). Add the
missing information as a source so future visitors get an answer.
## Related
Set the welcome message and suggested questions.
Style the chat to match your brand.
What sign-in and paywalls look like to visitors.
Add the chat to your website.