> ## Documentation Index
> Fetch the complete documentation index at: https://docs.a2v2.ai/llms.txt
> Use this file to discover all available pages before exploring further.
# Sign-In & Paywall (Visitor Side)
> What visitors experience when an agent is gated: email OTP sign-in for restricted agents, and the Stripe paywall for Pay-for-Access agents.
Not every agent is open to everyone. When you set an agent's access mode to
**Restrict** or **Pay for Access**, visitors meet a gate before they can chat. This
page shows exactly what that gate looks like from the visitor's side, so you know what
you're sending people into.
You choose the access mode on the **Visibility** screen — see
[Visibility & access](/embed/visibility). The setup for charging visitors lives in
[Paid agents](/billing/paid-agents). This page is the visitor's-eye view.
## When does a visitor hit a gate?
| Access mode | What the visitor sees |
| ------------------ | ------------------------------------------------------------ |
| **Use for Free** | Nothing — they start chatting right away. |
| **Restrict** | An email sign-in prompt. Only people in your CRM can get in. |
| **Pay for Access** | A paywall. They pay (via Stripe) before chatting. |
## Restricted agents: email sign-in
When an agent is **Restricted**, only the contacts in your [CRM](/concepts) can use
it. Visitors verify their email with a one-time code (OTP) — no password to remember.
### What the visitor does
The chat shows **Authenticate To Use the Chatbot** with an email box (*"Your Email
Address"*). A helper line makes the rule clear: *"Only users added in the CRM can
access this chatbot."* The visitor enters their email and selects **Send code**.
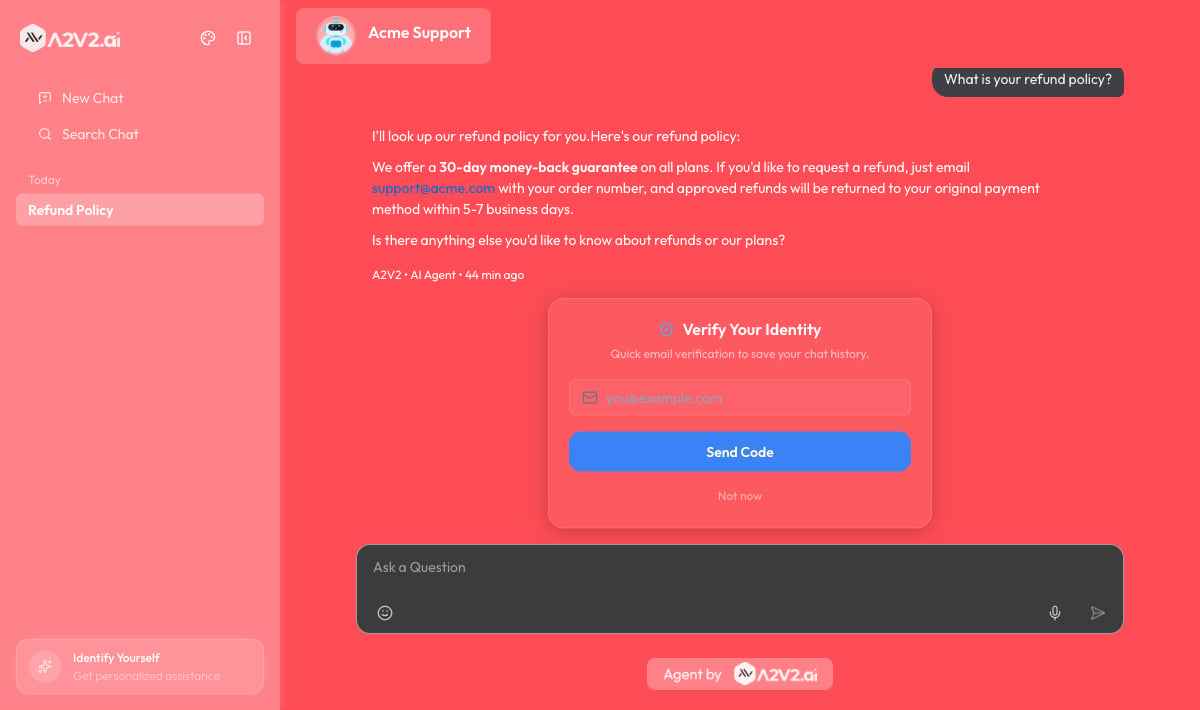 A 6-digit code is emailed to them: *"An OTP has been sent to your email. Please
enter it to authenticate."* The screen confirms **Code sent to** their address,
with a quick **Open Gmail** shortcut and a countdown (**Expires in…**).
Once the code checks out, they're in and can chat. Their conversation is now tied
to their verified identity, so their history follows them when they return.
### If they don't get the code
The sign-in screen helps visitors recover without contacting you. They can **Resend**
the code (after a short cooldown — *"Resend in…"*), or **Change email** if they typed
it wrong. A **Need help?** section spells out the usual fixes:
* *"Check your spam folder"*
* *"Make sure your email is correct"*
* *"Wait a moment and try Resend"*
For security, too many wrong attempts temporarily locks sign-in — *"Too many attempts.
Please request a new code."* The visitor simply requests a fresh code to continue.
Codes also expire after a while, so very old codes won't work.
A visitor can only sign in if their email is already a contact in your CRM. If someone
you expect to have access is turned away, add them as a contact first. See the
[CRM overview](/concepts).
## Pay-for-Access agents: the paywall
When an agent uses **Pay for Access**, visitors pay you for access before they can
chat. Payment is handled securely through Stripe — visitors never enter card details
inside your site.
### What the visitor does
Instead of the chat, the visitor sees a paywall headed **This Chatbot is Monetized
by the Creator**, with the invitation *"Get continued access to insights,
responses, and features by subscribing."* The button shows your price — for
example **Subscribe for** \$X.
The visitor enters their email to start (*"Please enter your email address to start
with your account"*), then selects **Subscribe Now** and completes payment on
Stripe's secure checkout.
After paying, they're returned to the chat and can start talking. A banner confirms
they're subscribed and shows how much access remains: *"You're now subscribed to
the chatbot. You have … of access remaining."*
### Running low or expiring
Access is metered by the **duration** and **message allowance** you configured (see
[Paid agents](/billing/paid-agents)). As a visitor approaches the limit, the chat
nudges them:
| State | What the visitor sees |
| --------------------- | ------------------------------------------------------------------------------------------------------------- |
| **Running low** | *"…of access remaining. Upgrade now to keep chatting without interruptions."* with an **Upgrade Now** button. |
| **Expired / used up** | *"Your access has expired or credits exhausted."* and a prompt to upgrade to continue. |
The access a visitor buys is *their* allowance for *your* agent — it's separate from
your own A2V2.ai plan credits. For how you set the price, duration, and message
allowance (and track revenue), see [Paid agents](/billing/paid-agents).
## Tips
* Use **Restrict** for internal tools, member-only assistants, or anything where you
want to know exactly who's chatting — every sign-in becomes a known contact.
* Use **Pay for Access** when the agent is valuable enough that people will pay for
it; keep it **Use for Free** when your goal is reach and lead capture.
* Tell visitors up front (on the page hosting the agent) that they'll sign in or pay,
so the gate isn't a surprise.
## Troubleshooting
Their email must be a contact in your CRM. Add them as a contact, then have them
try **Send code** again.
Ask the visitor to check spam, confirm the email is spelled correctly, and use
**Resend** after the cooldown. Codes expire, so they should use the most recent one.
Their access **duration** may have ended or their **message allowance** may be used
up. Check their status under the agent's **Subscriptions** — see
[Paid agents](/billing/paid-agents).
Switch the agent's access mode on the [Visibility](/embed/visibility) screen.
Choosing **Use for Free** removes sign-in and payment entirely.
## Related
Where you set the access mode for each agent.
Set the price, duration, and allowance, and track revenue.
What the chat itself looks like once visitors are in.
Add the gated agent to your website.
A 6-digit code is emailed to them: *"An OTP has been sent to your email. Please
enter it to authenticate."* The screen confirms **Code sent to** their address,
with a quick **Open Gmail** shortcut and a countdown (**Expires in…**).
Once the code checks out, they're in and can chat. Their conversation is now tied
to their verified identity, so their history follows them when they return.
### If they don't get the code
The sign-in screen helps visitors recover without contacting you. They can **Resend**
the code (after a short cooldown — *"Resend in…"*), or **Change email** if they typed
it wrong. A **Need help?** section spells out the usual fixes:
* *"Check your spam folder"*
* *"Make sure your email is correct"*
* *"Wait a moment and try Resend"*
For security, too many wrong attempts temporarily locks sign-in — *"Too many attempts.
Please request a new code."* The visitor simply requests a fresh code to continue.
Codes also expire after a while, so very old codes won't work.
A visitor can only sign in if their email is already a contact in your CRM. If someone
you expect to have access is turned away, add them as a contact first. See the
[CRM overview](/concepts).
## Pay-for-Access agents: the paywall
When an agent uses **Pay for Access**, visitors pay you for access before they can
chat. Payment is handled securely through Stripe — visitors never enter card details
inside your site.
### What the visitor does
Instead of the chat, the visitor sees a paywall headed **This Chatbot is Monetized
by the Creator**, with the invitation *"Get continued access to insights,
responses, and features by subscribing."* The button shows your price — for
example **Subscribe for** \$X.
The visitor enters their email to start (*"Please enter your email address to start
with your account"*), then selects **Subscribe Now** and completes payment on
Stripe's secure checkout.
After paying, they're returned to the chat and can start talking. A banner confirms
they're subscribed and shows how much access remains: *"You're now subscribed to
the chatbot. You have … of access remaining."*
### Running low or expiring
Access is metered by the **duration** and **message allowance** you configured (see
[Paid agents](/billing/paid-agents)). As a visitor approaches the limit, the chat
nudges them:
| State | What the visitor sees |
| --------------------- | ------------------------------------------------------------------------------------------------------------- |
| **Running low** | *"…of access remaining. Upgrade now to keep chatting without interruptions."* with an **Upgrade Now** button. |
| **Expired / used up** | *"Your access has expired or credits exhausted."* and a prompt to upgrade to continue. |
The access a visitor buys is *their* allowance for *your* agent — it's separate from
your own A2V2.ai plan credits. For how you set the price, duration, and message
allowance (and track revenue), see [Paid agents](/billing/paid-agents).
## Tips
* Use **Restrict** for internal tools, member-only assistants, or anything where you
want to know exactly who's chatting — every sign-in becomes a known contact.
* Use **Pay for Access** when the agent is valuable enough that people will pay for
it; keep it **Use for Free** when your goal is reach and lead capture.
* Tell visitors up front (on the page hosting the agent) that they'll sign in or pay,
so the gate isn't a surprise.
## Troubleshooting
Their email must be a contact in your CRM. Add them as a contact, then have them
try **Send code** again.
Ask the visitor to check spam, confirm the email is spelled correctly, and use
**Resend** after the cooldown. Codes expire, so they should use the most recent one.
Their access **duration** may have ended or their **message allowance** may be used
up. Check their status under the agent's **Subscriptions** — see
[Paid agents](/billing/paid-agents).
Switch the agent's access mode on the [Visibility](/embed/visibility) screen.
Choosing **Use for Free** removes sign-in and payment entirely.
## Related
Where you set the access mode for each agent.
Set the price, duration, and allowance, and track revenue.
What the chat itself looks like once visitors are in.
Add the gated agent to your website.