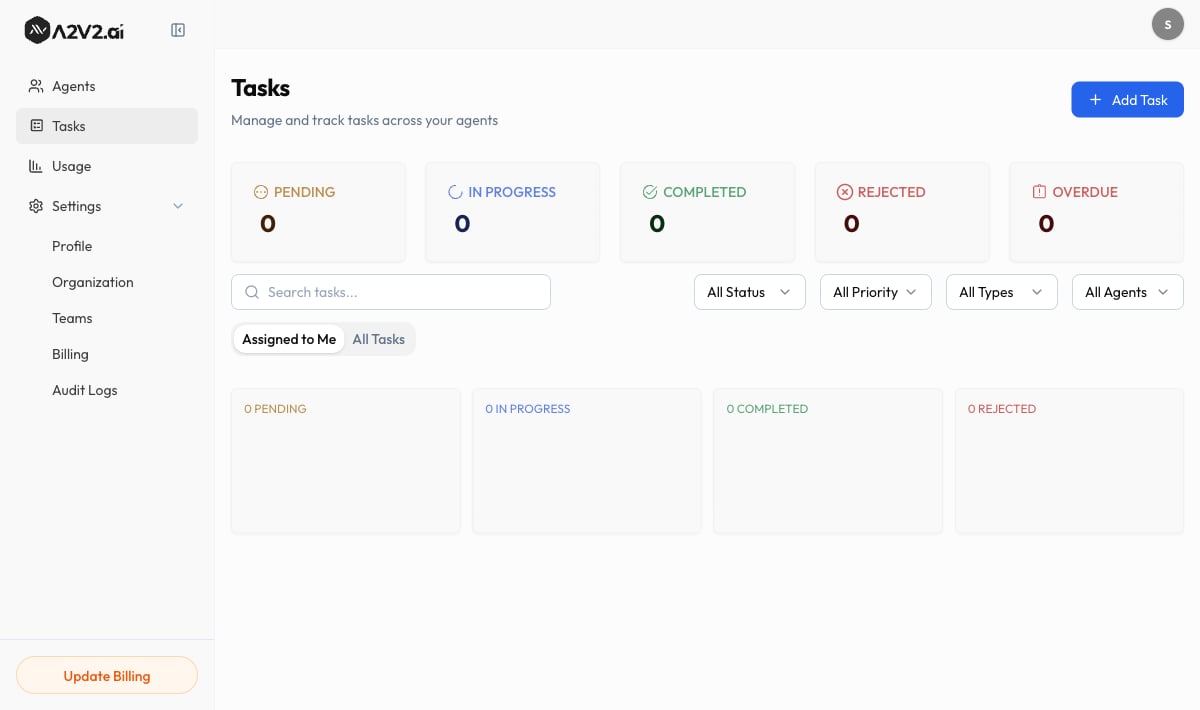
/tasks). The page is titled Tasks, with the
subtitle “Manage and track tasks across your agents.”
Prerequisites
- A task always needs an Assignee, so you’ll want at least one team member — including yourself.
- Linking a task to an Agent or Contact is optional but recommended when the task came out of a conversation.
- Reassigning a task to a different person is limited to admins and owners.
Find your way around the board
The Tasks page gives you two tabs and a row of filters so you can cut a long list down to exactly what you need.| Control | What it does |
|---|---|
| Assigned to Me tab | Shows only the tasks assigned to you — your personal to-do list. |
| All Tasks tab | Shows every task in the organization. |
| Search tasks… | Find a task by its title. |
| All Status | Filter by status (Pending, In Progress, Completed, Overdue, Rejected). |
| All Priority | Filter by priority (Low, Medium, High, Urgent). |
| All Types | Filter by type (Call, Email, Follow Up, Issue, Request, Meeting, General). |
| All Agents | Filter to tasks linked to a specific agent. |
Create a task
Open the task form
Select Add Task. The Add New Task drawer opens with the subtitle “Fill in the
details to create a new task.”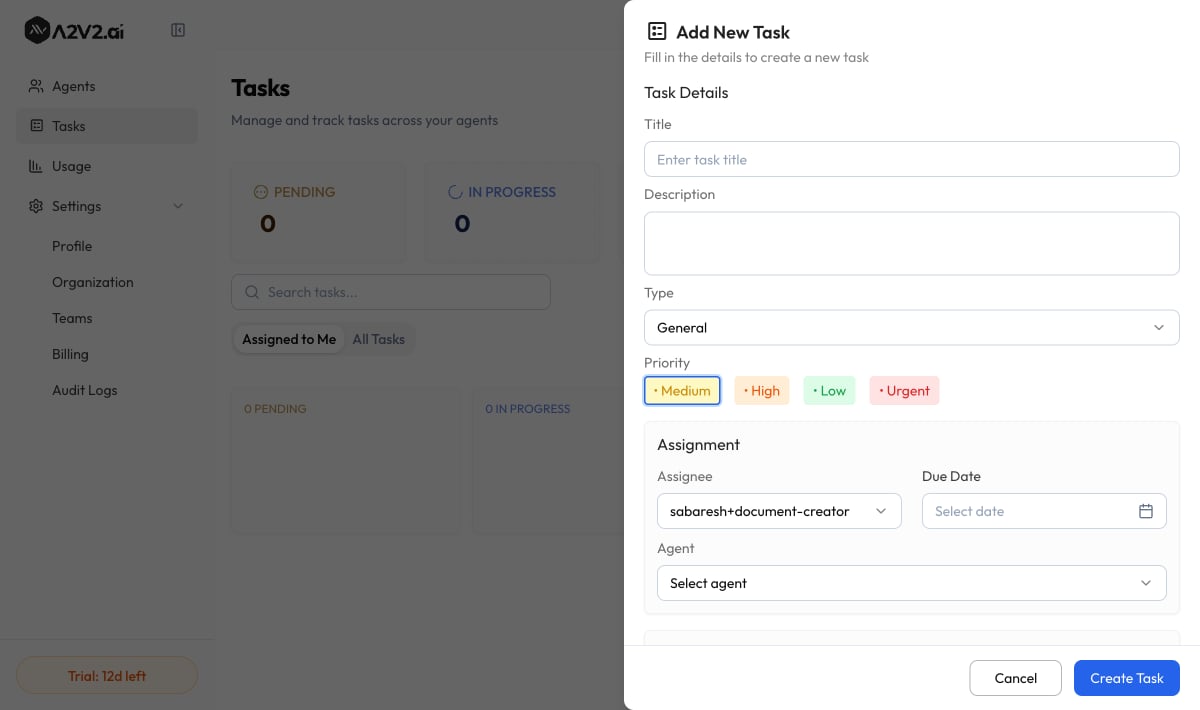
Fill in the task details
Under Task Details, give the task a Title (“Enter task title”) and an optional
Description. Choose a Type and a Priority (see the reference tables below).
Titles are required and capped at 200 characters; descriptions can be up to 5,000.
Assign it and set a due date
Under Assignment, pick an Assignee (“Select assignee”) — this is required —
and optionally a Due Date and the Agent the task relates to.
Add the extras (optional)
Expand More Options to link a Contact, add Watchers, apply Tags, or
build a Checklist. These are covered below.
Task types
Pick the type that matches the work so you can filter by it later.| Type | Use it for |
|---|---|
| Call | A phone call you need to make or return. |
| An email to send or follow up on. | |
| Follow Up | Checking back in with a lead or customer. |
| Issue | Something that’s broken or needs fixing. |
| Request | A customer request to action. |
| Meeting | Scheduling or preparing for a meeting. |
| General | Anything that doesn’t fit the above. |
Priority
| Priority | Notes |
|---|---|
| Low | Nice-to-do, no urgency. |
| Medium | The default for a new task. |
| High | Should be handled soon. |
| Urgent | Needs attention now. |
Statuses
A task moves through statuses as the work progresses. On an open task, click a status to move it — “Pending → In Progress → Done” — and the assignee and watchers are notified of the change.| Status | Meaning |
|---|---|
| Pending | Created but not yet started. |
| In Progress | Someone is actively working on it. |
| Completed | The work is done. |
| Overdue | Past its due date and not yet completed. |
| Rejected | Declined or won’t be done. |
Assign and reassign
Every task has one Assignee — the person responsible for getting it done. You set the assignee when you create the task. To hand a task to someone else, open it and choose a different team member. Reassigning is restricted to admins and owners, so day-to-day members can’t quietly move work off their plate. The new assignee is notified.Watchers
Watchers are team members who want to stay in the loop on a task without owning it — a manager keeping an eye on a key account, or a colleague who’ll pick the task up next. On a task, select + Add Watcher and search your team members to add them. Watchers get notified on status changes, comments, and updates. Add watchers while creating a task under More Options, or any time afterward from the open task.Checklists
Break a task into smaller steps with a Checklist — useful when “follow up with the customer” actually means three or four sub-steps. Type a Checklist item and select Add checklist to add it, then check items off as you complete them. The task itself stays a single trackable unit while the checklist captures the detail.Comments and activity
Open a task to discuss it in context. Under Comments, type into “Add a comment…” and select Send. Comments keep the conversation about the work attached to the work itself, instead of scattered across chat and email. Use View all Comments to expand a long thread and Show less to collapse it again. The Activity log records what changed on the task — status moves, reassignments, and updates — so anyone opening it later can see the full history. Use View all Activities to see the complete trail.Tags
Add Tags to categorize and group related tasks. Type a tag and press Enter to add it, and click × to remove one. Once tagged, you can use tags to filter the board down to a campaign, a customer segment, or any grouping that fits how your team works.Link a task to a contact and agent
When a task comes out of a conversation, link it back to its source. Under More Options, choose a Contact (search your CRM contacts) and, under Assignment, the Agent the task relates to. This connects the follow-up to the person who asked and the agent that handled them — so the next person to pick it up has the full picture without digging.Edit and delete a task
To change a task’s details, open it and select Edit Tasks (“Update the details below and save your changes”), make your changes, and select Save Changes.Troubleshooting
I can't reassign a task to someone else
I can't reassign a task to someone else
Only admins and owners can reassign tasks. If you’re a member, ask an admin or
owner to move it, or check your role under Team members.
A task is marked Overdue
A task is marked Overdue
A task becomes Overdue when it passes its Due Date without being completed. Open
it to update the status, push the due date out, or reassign it.
A teammate isn't getting notified about a task
A teammate isn't getting notified about a task
Notifications go to the Assignee and to Watchers. If someone needs updates on a
task they don’t own, add them as a watcher with + Add Watcher.
I can't find a task I created
I can't find a task I created
Switch to the All Tasks tab — the Assigned to Me tab only shows tasks assigned
to you. Then clear any Status, Priority, Type, or Agent filters, or
search by the task’s title.
Related
Contacts
Link a task to the person it’s about and see their full history.
Conversation history
Spot the follow-ups worth turning into tasks.
Team members & roles
Add the teammates you’ll assign tasks to and set who can reassign.
Automations
Route and organize contacts automatically as they arrive.